
Creating a Bootable USB Drive for Windows 11: A Comprehensive Guide
Related Articles: Creating a Bootable USB Drive for Windows 11: A Comprehensive Guide
Introduction
With enthusiasm, let’s navigate through the intriguing topic related to Creating a Bootable USB Drive for Windows 11: A Comprehensive Guide. Let’s weave interesting information and offer fresh perspectives to the readers.
Table of Content
Creating a Bootable USB Drive for Windows 11: A Comprehensive Guide
The process of creating a bootable USB drive for Windows 11 is essential for various scenarios, including:
- Clean Installation: Installing a fresh copy of Windows 11 on a new or existing computer.
- Upgrade: Upgrading an existing operating system to Windows 11.
- Troubleshooting: Repairing or restoring a corrupted Windows installation.
- Dual Booting: Installing Windows 11 alongside another operating system.
This guide provides a detailed walkthrough on how to create a bootable USB drive for Windows 11, encompassing the necessary steps, tools, and considerations.
1. Prerequisites
- Windows 11 ISO File: Download the official Windows 11 ISO file from Microsoft’s website. Ensure you select the correct edition and language for your needs.
- USB Flash Drive: A USB flash drive with at least 8GB of storage space. Ensure the drive is formatted as FAT32.
- Rufus: A free and open-source utility designed to create bootable USB drives. Download the latest version from the official Rufus website.
2. Creating the Bootable USB Drive
- Download and Install Rufus: Once downloaded, run the Rufus installer and follow the on-screen prompts to install it on your computer.
- Launch Rufus: Open Rufus from the Start menu or desktop shortcut.
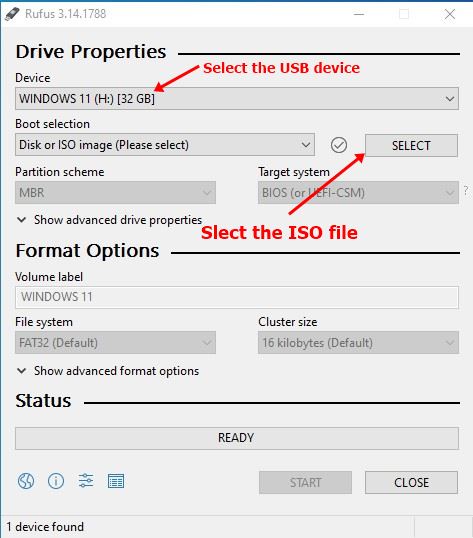
- Select the USB Drive: In the Rufus window, select the USB flash drive from the "Device" dropdown menu.
- Select Boot Selection: Choose "Select" and browse to the location of the downloaded Windows 11 ISO file.
- Format Options: Leave the default settings for "File System" (FAT32) and "Cluster size" (Default).
- Partition Scheme: Select "GPT" for newer computers with UEFI firmware.
- Target System: Choose "UEFI (non-CSM)" for newer computers with UEFI firmware.
-
Additional Options:
- "Create extended label and icon files" can be checked for better visual identification of the USB drive.
- "Format options" can be left as "Quick format" for faster creation.
- Start the Process: Click the "START" button to begin creating the bootable USB drive. This process may take several minutes depending on the size of the ISO file and the speed of your computer.
- Verification: Once the process is complete, Rufus will display a confirmation message. Verify that the USB drive is successfully bootable by checking if it appears as a bootable drive in your BIOS settings.
3. Using the Bootable USB Drive
After creating the bootable USB drive, you can use it to install Windows 11 on a computer.
- Boot from the USB Drive: Restart the computer and access the BIOS settings by pressing the designated key (usually F2, F12, or Delete) during the boot process.
- Change Boot Order: In the BIOS settings, navigate to the "Boot" or "Boot Order" section and set the USB drive as the first boot device.
- Save Changes: Save the changes to the BIOS settings and exit.
- Windows 11 Setup: The computer will boot from the USB drive, launching the Windows 11 setup process. Follow the on-screen instructions to install Windows 11.
4. Considerations and Tips
- Backup Your Data: Before proceeding with a clean installation or upgrade, ensure you back up all important data from the target computer.
- USB Drive Compatibility: While most USB flash drives are compatible, it’s recommended to use a high-quality drive with a good write speed for optimal performance.
- BIOS Settings: Different computers have different BIOS settings. Refer to your computer’s manual or online resources for specific instructions on accessing and configuring the BIOS settings.
- Troubleshooting: If you encounter any errors during the process, refer to the Rufus documentation or search for solutions online.
5. FAQs
Q: What is the minimum system requirement for Windows 11?
A: Windows 11 requires a 64-bit processor with at least 1 GHz or faster, 4 GB RAM, 64 GB storage space, and a compatible graphics card. Additionally, a TPM 2.0 module and UEFI firmware with Secure Boot are essential.
Q: Can I create a bootable USB drive without Rufus?
A: Yes, you can use other tools like the Windows USB/DVD Download Tool or the Media Creation Tool provided by Microsoft. However, Rufus is a popular choice due to its user-friendly interface and flexibility.
Q: Can I reuse the USB drive for other purposes after creating a bootable drive?
A: Yes, you can format the USB drive and use it for other purposes after creating a bootable drive.
Q: What happens to my existing data during a clean installation?
A: A clean installation will erase all data on the target drive. Ensure you have backed up all important data before proceeding.
Q: Can I create a bootable USB drive for multiple editions of Windows 11?
A: No, each bootable USB drive is specific to the downloaded Windows 11 ISO file, including the edition and language.
6. Conclusion
Creating a bootable USB drive for Windows 11 is a straightforward process that empowers users to install, upgrade, or troubleshoot their operating system. By following the steps outlined in this guide, users can ensure a smooth and efficient experience, enabling them to leverage the full potential of Windows 11.

![How to Make Windows 11 Bootable USB Drive [Step-by-Step Guide] - MiniTool Partition Wizard](https://www.partitionwizard.com/images/uploads/2021/07/windows-11-bootable-usb-drive-thumbnail.jpg)

Closure
Thus, we hope this article has provided valuable insights into Creating a Bootable USB Drive for Windows 11: A Comprehensive Guide. We thank you for taking the time to read this article. See you in our next article!