
Enabling Secure Remote Access: A Guide to Setting Up an SSH Server on Windows 11
Related Articles: Enabling Secure Remote Access: A Guide to Setting Up an SSH Server on Windows 11
Introduction
With enthusiasm, let’s navigate through the intriguing topic related to Enabling Secure Remote Access: A Guide to Setting Up an SSH Server on Windows 11. Let’s weave interesting information and offer fresh perspectives to the readers.
Table of Content
- 1 Related Articles: Enabling Secure Remote Access: A Guide to Setting Up an SSH Server on Windows 11
- 2 Introduction
- 3 Enabling Secure Remote Access: A Guide to Setting Up an SSH Server on Windows 11
- 3.1 Understanding the Benefits of an SSH Server on Windows 11
- 3.2 Setting Up an SSH Server on Windows 11
- 3.3 Managing SSH Users and Permissions
- 3.4 Troubleshooting Common SSH Server Issues
- 3.5 FAQs
- 3.6 Tips for Using an SSH Server on Windows 11
- 3.7 Conclusion
- 4 Closure
Enabling Secure Remote Access: A Guide to Setting Up an SSH Server on Windows 11

In the realm of modern computing, remote access plays a crucial role. It enables administrators to manage systems from afar, developers to collaborate on projects remotely, and users to access their files and applications from any location. While the traditional Remote Desktop Protocol (RDP) offers a graphical interface for remote access, it operates over an unencrypted channel, making it vulnerable to security threats.
Enter the Secure Shell (SSH) protocol, a powerful and secure method for remote access and command-line interaction. Unlike RDP, SSH encrypts all communication, ensuring the integrity and confidentiality of data exchanged between the client and the server. This robust security feature makes SSH an ideal choice for sensitive operations and environments where data protection is paramount.
Windows 11, Microsoft’s latest operating system, offers built-in support for SSH servers, eliminating the need for external software and simplifying the setup process. This article provides a comprehensive guide to setting up an SSH server on Windows 11, exploring its benefits, configuring the server, managing users, and troubleshooting common issues.
Understanding the Benefits of an SSH Server on Windows 11
Enhanced Security: SSH’s encryption ensures that all data transmitted between the client and the server is protected from eavesdropping and tampering. This is particularly important for tasks involving sensitive information, such as managing network configurations, accessing system logs, or deploying software updates.
Remote Command Execution: SSH allows users to execute commands remotely on the server, granting them full control over the system. This is invaluable for administrators who need to perform tasks such as installing software, troubleshooting issues, or managing services without physically accessing the machine.
File Transfer: The SSH protocol includes the Secure Copy (SCP) and Secure File Transfer Protocol (SFTP) features, enabling secure file transfers between the client and the server. This is particularly useful for transferring large files or sensitive data without compromising security.
Automation and Scripting: SSH’s command-line interface allows for seamless integration with automation tools and scripting languages. This empowers users to automate repetitive tasks, manage complex workflows, and streamline administrative operations.
Cross-Platform Compatibility: SSH is a widely adopted protocol, supported by a broad range of operating systems, including Windows, macOS, Linux, and Unix. This ensures compatibility and accessibility for diverse user environments.
Setting Up an SSH Server on Windows 11
Setting up an SSH server on Windows 11 is a straightforward process, involving the following steps:
-
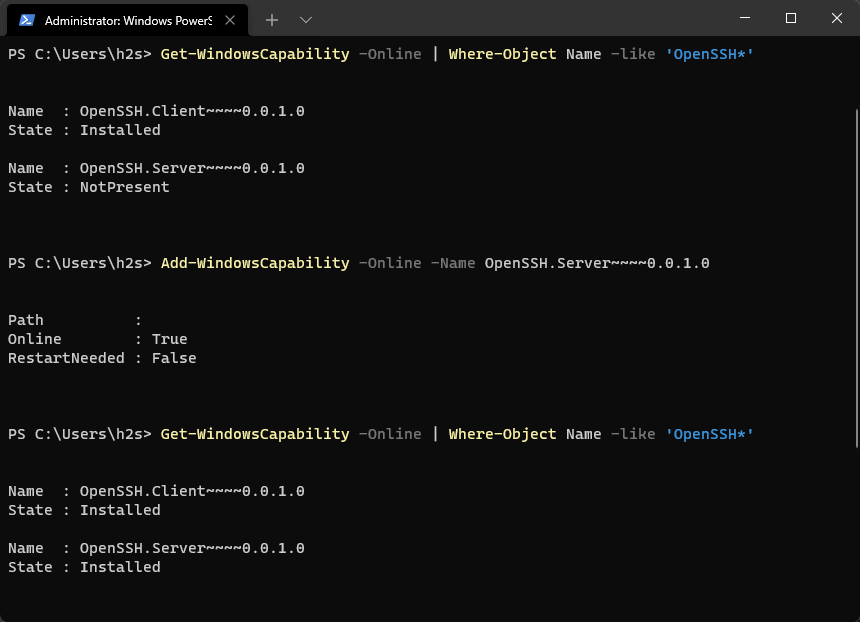
Enabling the OpenSSH Server:
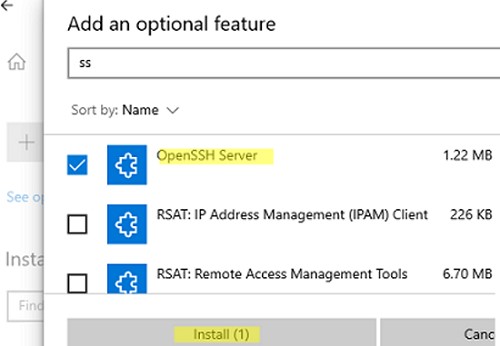
- Open the "Windows Features" window by searching for "Turn Windows features on or off" in the Start menu.
- Navigate to "OpenSSH Server" and check the boxes for both "OpenSSH Server" and "OpenSSH Client".
- Click "OK" and allow the installation process to complete.
-
Starting the OpenSSH Service:
- Open the "Services" window by searching for "services.msc" in the Start menu.
- Locate the "OpenSSH Server" service and double-click it.
- Ensure the startup type is set to "Automatic" and click "Start" if the service is not already running.
-
Configuring the SSH Server:
- Open the "Windows PowerShell" as an administrator.
- Execute the following command to access the OpenSSH configuration file:
notepad "C:Program FilesOpenSSHsshd_config" - Modify the configuration file as needed, making sure to understand the implications of each setting.
- Common configuration options include:
- Port: Change the default SSH port (22) to a different port for enhanced security.
- Password Authentication: Enable or disable password authentication for user login.
- Public Key Authentication: Configure public key authentication for secure and passwordless logins.
- Firewall Rules: Ensure that the firewall allows incoming connections on the chosen SSH port.
-
Creating SSH Users:
- Open the "Command Prompt" as an administrator.
- Use the
net usercommand to create new users with SSH access. - For example, the following command creates a user named "sshuser" with a password "password123":
net user sshuser password123 /add - Use the
net localgroupcommand to add the new user to the "Administrators" group to grant them full administrative privileges.
-
Testing the SSH Server:
- Use an SSH client (such as PuTTY or OpenSSH client) to connect to the server using the configured IP address and port.
- Enter the username and password (or use the private key) to authenticate and access the remote shell.
Managing SSH Users and Permissions
Once the SSH server is set up, you can manage users and their permissions using the following methods:
User Management:
-
Adding Users: Use the
net usercommand to create new users with SSH access. -
Deleting Users: Use the
net usercommand with the/deleteoption to remove users. -
Modifying User Passwords: Use the
net usercommand with the/passwordchgoption to change user passwords.
Permission Management:
-
Granting Administrative Privileges: Use the
net localgroupcommand to add users to the "Administrators" group. -
Limiting User Access: Use the
net localgroupcommand to remove users from the "Administrators" group or create custom groups with specific permissions. - Restricting SSH Access: Configure the SSH server to allow access only from specific IP addresses or networks.
Troubleshooting Common SSH Server Issues
While setting up an SSH server is relatively straightforward, you may encounter some common issues:
Connection Issues:
- Firewall Blockage: Ensure that the firewall allows incoming connections on the SSH port.
- Incorrect IP Address or Port: Verify the IP address and port used for connection.
- Server Not Running: Check if the OpenSSH service is running.
Authentication Issues:
- Incorrect Username or Password: Verify the username and password used for authentication.
- Public Key Authentication Problems: Ensure that the private key file is available and has the correct permissions.
Other Issues:
- Configuration Errors: Review the SSH server configuration file for any errors or misconfigurations.
- System Updates: Ensure that the system is up-to-date with the latest patches and security updates.
FAQs
Q: What are the security implications of enabling an SSH server on Windows 11?
A: Enabling an SSH server on Windows 11 introduces potential security risks if not properly configured. It is crucial to follow best practices for securing the server, including using strong passwords, enabling public key authentication, and restricting access to authorized users only.
Q: Can I use an SSH client on a different operating system to connect to the Windows 11 SSH server?
A: Yes, SSH is a cross-platform protocol. You can use SSH clients on various operating systems, such as macOS, Linux, and Unix, to connect to the Windows 11 SSH server.
Q: Is it possible to access the Windows 11 desktop through SSH?
A: While SSH provides access to the command line and file system, it does not offer a graphical interface like RDP. To access the desktop remotely, you need to use RDP or a similar protocol.
Q: How can I improve the security of my SSH server?
A: You can enhance the security of your SSH server by:
- Disabling password authentication: Use public key authentication for more secure logins.
- Changing the default SSH port: This makes it harder for attackers to find and exploit the server.
- Restricting access to specific IP addresses: Allow connections only from authorized networks.
- Enabling SSH logging: This provides valuable information for security audits and troubleshooting.
- Keeping the server updated: Regularly install security patches and updates to mitigate vulnerabilities.
Tips for Using an SSH Server on Windows 11
- Use a strong password or passphrase for SSH authentication.
- Enable public key authentication for enhanced security and passwordless logins.
- Restrict SSH access to authorized users and IP addresses.
- Regularly review and update the SSH server configuration file.
- Monitor SSH logs for suspicious activity.
- Keep the SSH server and its associated software up-to-date with the latest security patches.
Conclusion
Setting up an SSH server on Windows 11 provides a secure and reliable method for remote access, command execution, and file transfer. It empowers administrators to manage systems remotely, developers to collaborate on projects, and users to access their files and applications from any location. By understanding the benefits, configuring the server, managing users, and implementing best practices for security, you can leverage the power of SSH to enhance your productivity and protect your data.


Closure
Thus, we hope this article has provided valuable insights into Enabling Secure Remote Access: A Guide to Setting Up an SSH Server on Windows 11. We hope you find this article informative and beneficial. See you in our next article!