
Understanding the Location of Screenshots in Windows 11: A Comprehensive Guide
Related Articles: Understanding the Location of Screenshots in Windows 11: A Comprehensive Guide
Introduction
With enthusiasm, let’s navigate through the intriguing topic related to Understanding the Location of Screenshots in Windows 11: A Comprehensive Guide. Let’s weave interesting information and offer fresh perspectives to the readers.
Table of Content
Understanding the Location of Screenshots in Windows 11: A Comprehensive Guide

Screenshots are an invaluable tool for capturing and sharing information from a computer screen. Whether it’s documenting a technical issue, highlighting a specific detail, or simply capturing a funny meme, the ability to take a screenshot is essential in today’s digital world. Windows 11, like its predecessors, offers several methods for taking screenshots, each with its own nuances and default saving locations. This article provides a comprehensive guide to understanding where screenshots are saved in Windows 11, highlighting the various methods and their associated file paths.
The Default Screenshot Location in Windows 11
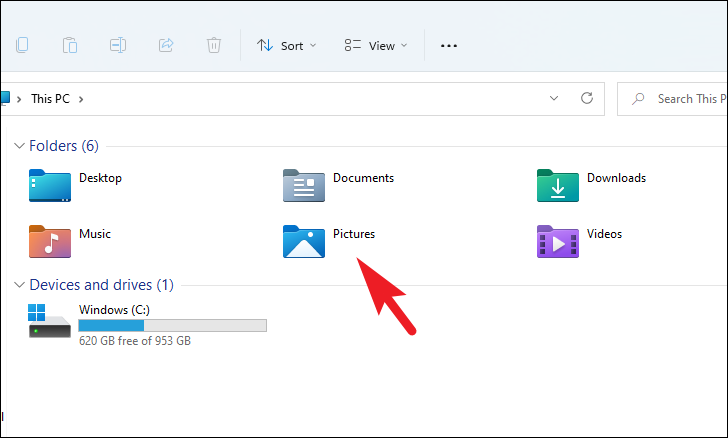
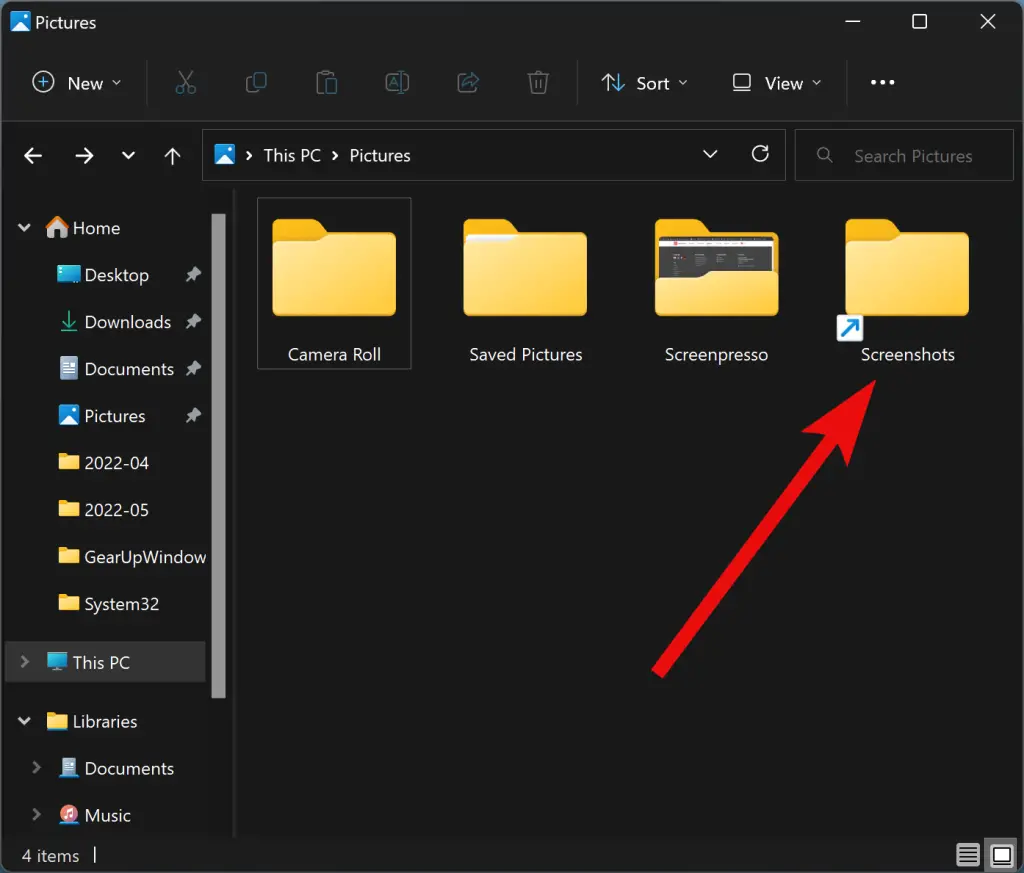
By default, Windows 11 saves screenshots to the Pictures folder, specifically within a subfolder named Screenshots. This location is consistent across different screenshot methods, ensuring a centralized and easily accessible repository for all captured images.
Exploring Screenshot Methods and Their File Paths
Windows 11 offers a variety of methods for taking screenshots, each with its own advantages and default saving locations.
-
The Print Screen Key (PrtScn): This classic method captures the entire screen and saves it to the clipboard. To access the screenshot, you must paste it into an image editing program like Paint or a document editor. The screenshot is not saved directly to a file.
-
The Alt + Print Screen Key Combination: This method captures only the active window, saving it to the clipboard for later pasting. Similar to the Print Screen key, it does not save the screenshot directly to a file.
-
Windows Key + Print Screen Key: This combination captures the entire screen and saves it as a PNG file directly to the Screenshots folder within the Pictures folder. This is the most straightforward and commonly used method for capturing and saving screenshots in Windows 11.
-
Windows Key + Shift + S: This combination activates the Snipping Tool, allowing users to select a specific area of the screen to capture. The captured area is then saved to the clipboard. To save the screenshot as a file, users can paste it into an image editor or use the Snipping Tool’s built-in save functionality.
-
The Snipping Tool: This built-in Windows 11 application offers a variety of screenshot options, including free-form snips, rectangular snips, and window snips. The Snipping Tool allows users to annotate and save screenshots directly to a file. By default, the screenshots are saved to the Pictures folder, but users can customize the save location within the Snipping Tool settings.
Customizing Screenshot Saving Locations
While the default screenshot location in Windows 11 is convenient, users may prefer to save their screenshots in a different folder for better organization or specific project needs. Fortunately, Windows 11 offers flexibility in customizing screenshot saving locations.
-
For the Windows Key + Print Screen Key method: Users can change the default save location by adjusting the settings within the Photos app. Open the Photos app, navigate to the Settings menu, and under the General tab, select the desired save location for screenshots.
-
For the Snipping Tool: Users can customize the save location directly within the Snipping Tool’s interface. When taking a screenshot, click the Save button and choose the desired folder for saving the captured image. Alternatively, users can access the Settings menu within the Snipping Tool and change the default save location for all future screenshots.
Understanding the Importance of Screenshot Locations
The location where screenshots are saved plays a crucial role in accessibility, organization, and overall user experience. By understanding the default screenshot location and customizing it as needed, users can:
- Easily access their screenshots: Having all screenshots saved in a centralized location like the Pictures folder ensures easy access and retrieval.
- Maintain a well-organized file system: By choosing a specific folder for screenshots, users can categorize them based on projects, topics, or other criteria, ensuring efficient file management.
- Improve workflow and productivity: By customizing the save location, users can streamline their workflow by directly saving screenshots to project folders, eliminating the need for manual file transfers.
FAQs about Screenshot Locations in Windows 11
Q: Can I change the default file format for screenshots?
A: While Windows 11 defaults to saving screenshots as PNG files, users cannot change the default file format. However, they can save screenshots in different formats using the Snipping Tool or by pasting the captured image into an image editor and saving it in the desired format.
Q: Can I use a third-party screenshot tool instead of the built-in options?
A: Yes, there are numerous third-party screenshot tools available, offering advanced features and customization options. These tools often allow users to customize the save location and file format for their screenshots.
Q: What happens to my screenshots if I reinstall Windows 11?
A: Reinstalling Windows 11 will erase all data on your system, including screenshots saved to the Pictures folder. It is recommended to back up important files, including screenshots, before reinstalling Windows 11.
Tips for Managing Screenshots in Windows 11
- Use descriptive file names: Instead of relying on default file names, give your screenshots descriptive names that reflect their content. This will make it easier to find them later.
- Create dedicated folders for screenshots: Organize your screenshots by project, topic, or date to ensure easy access and efficient file management.
- Utilize cloud storage: Consider using cloud storage services like OneDrive to back up your screenshots and access them from any device.
- Explore third-party tools: Consider using third-party screenshot tools for advanced features like annotation, video recording, and scrolling screenshots.
Conclusion
Understanding where screenshots are saved in Windows 11 is crucial for efficient file management and seamless workflow. By utilizing the default save location, customizing it as needed, and implementing best practices for organization, users can ensure their screenshots are easily accessible, well-organized, and ready for use. Whether capturing a technical issue, documenting a process, or simply sharing a funny meme, the ability to take and manage screenshots effectively is an essential skill for navigating the digital world.


Closure
Thus, we hope this article has provided valuable insights into Understanding the Location of Screenshots in Windows 11: A Comprehensive Guide. We appreciate your attention to our article. See you in our next article!